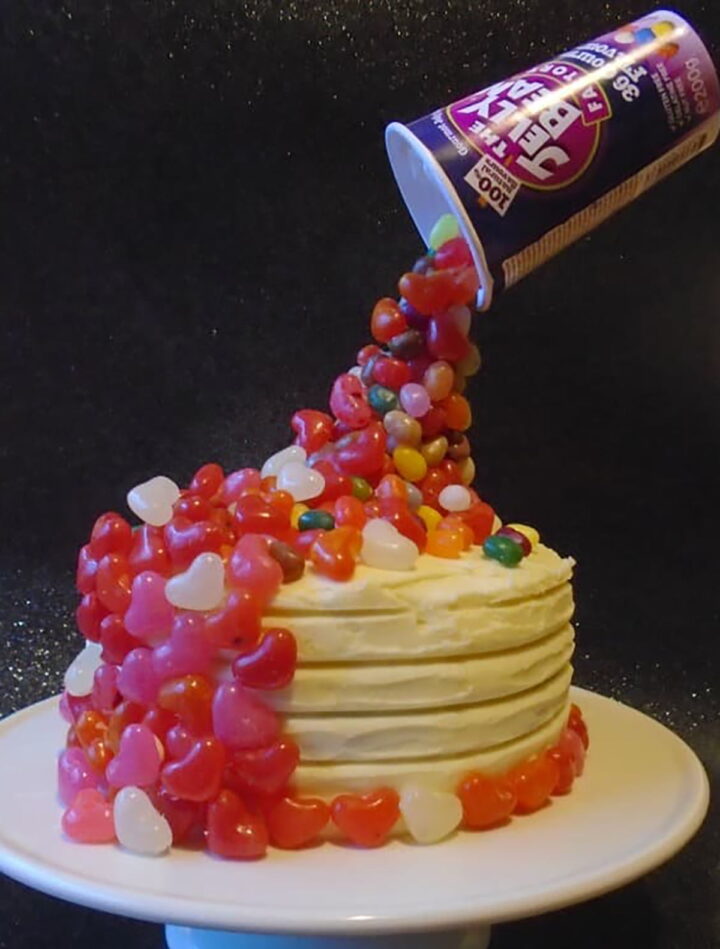
Jelly beans spill from a suspended tub in this fun anti-gravity cake thats surprisingly easy to make.

Made from a raspberry & white chocolate triple layered cake, smothered in a white chocolate & mascarpone frosting, this jelly bean illusion cake was made to celebrate Only Crumbs Remain's first anniversary.
It's the perfect celebration or birthday cake for jelly bean lovers everywhere and will appeal to the young and young at heart.
An illusion cake (also referred to as an anti gravity or gravity defying cake). seemded a great way to mark the occasion.
If you have been impressed with illusion cakes, and wondered how on earth all of those delicious sweets were held in suspended animation, you will be pleased to realised that it is seriously straightforward and no magic spells were needed.
Raspberry and white chocolate layer cake
The cake itself is a 3 layered raspberry and white chocolate sponge covered in a delicious white chocolate mascarpone frosting. (you might have noticed white chocolate and raspberry are one of my favourite flavour combinations.
Two of the sponge layers were flavoured with a raspberry paste and coloured with a little food colouring paste. These two layers sandwiched a delicious layer of white chocolate sponge.
The three sponges were sandwiched togteher with a thin layer of raspberry jam and frosting.
Frosting the cake
Crumb layer
After sandwiching the cakes together cover the whole cake with a thin layer of frosting and then pop into the fridge to firm up. This thin layer is known as a crumb layer and will help to prevent crumbs spoiling the appearance of the the frosting on the finished cake.
Final frosting
Next the top layer of the frosting is added. Spread evenly over the top on sides then use to create a pattern around the edge.
Tumbling jelly beans
Many illusion cakes are adorned with Maltesers but for something a little more colourful and cheery Jelly Beans work a treat. Not only are they vegetarian friendly, they're so much fun too, you never really know which flavour you're going to get!
The illusion was then created with the use of drinking straws creating a support and melted white chocolate which was used as a glue.
I used a mixture of regular shaped jelly beans and some heart shaped ones. In hindsight I think I should have used some cigarellos or white chocolate fingers to create a fence around the cake, but I'm still more than happy with how well it turned out given that it is my first attempt at an illusion cake.
Don't be put off by the long method in the recipe the cake is really rather e easy to make, but this youtube video is really helpful to show you how to build up the tumbling stack of sweets if you need a little more help.
📖 Recipe
Jelly bean illusion cake
Equipment
- 2 x 18cm ( 7") sandwich cake tins
- 3 straws or a cake dowel
- small strip of narrow sellotape
- Small paint brush, reserved for food use only
- Tissue Paper
- Jelly bean cup or bag
Ingredients
Raspberry sponge
- 150 g (5oz) butter , softened (plus a little extra for preparing the tins)
- 150 g (5oz)golden caster sugar
- 4 medium eggs beaten
- 1 teaspoon raspberry flavouring extract
- Red food colouring (optional)
- 150 g (5oz) self raising flour Plus a little extra for preparing the tins
- 2 tablespoon natural yoghurt or milk
White chocolate sponge
- 25 g (1oz) white chocolate
- 75 g (3oz) butter , softened (plus a little extra for preparing the tin)
- 75 g (3oz) golden caster sugar
- 1 teaspoon Vanilla Extract
- 2 medium Eggs beaten
- 75 g (3oz) self raising flour Plus a little extra for preparing the tins
Frosting
- 400 g (14oz) white chocolate
- 400 g (14oz) mascarpone
To complete
- 2 tablespoon seedless raspberry jam
- 50 g (2oz) white chocolate
- 500 g (1lb 2oz)Jelly beans
Instructions
- Preheat the oven to 180℃ (160℃ fan)/350°F/gas mark 4. Grease the base and side of two sandwich tins. Place a teaspoon of flour into one of the tins. Rock the tin around so that all of the greased surfaces are covered in flour. Knock the excess into the second tin and again distribute the flour in the same way. Tip out any excess flour.
Make the raspberry sponge layers
- Beat together 150g (5oz) butter and 150g (5oz) sugar until very pale and fluffy. Gradually add 4 beaten eggs a little at a time, beating well after each addition. Add 1 teaspoon raspberry flavouring and beat again. Then add a little food colouring and mix well.
- Sift in 150g (5oz) flour and gently fold, then fold in 2 tablespoons yogurt or milk and mix to combine. Divide the mixture between the two prepared sandwich tins and spread level . Bake for about 22 - 25 minutes or until springy to the touch. Cool in the tins for 5 minutes before transferring to a wire rack to cool completely.
TOo make the white chocolate sponge layer
- Prepare the third cake tin as before. Melt 425g (15oz) white chocolate in a heat proof bowl over a pan of hot water. Once the chocolate has almost melted remove it from the heat and stir until completely melted. Set aside to cool for 5 minutes.
- Beat together 75g (3oz) butter and 75g (3oz) sugar until very pale and fluffy. Gradually add 2 beaten eggs a little at a time, beating well after each addition. Sift in 75g (3oz) flour and gently fold in , then fold in 2 tablespoons of the melted white chocolate and mix to combine. Pour into the prepared sandwich tin and spread level . Bake for about 22 - 25 minutes or until springy to the touch. Cool in the tins for 5 minutes before transferring to a wire rack to cool completely.
Meanwhile make the frosting.
- Tip 400g (14oz) mascarpone into a bowl and stir briefly stir it to soften. Pour in the remaining cooled melted white chocolate and mix well. Cover and place in the fridge to firm up for about two hours.
To assemble the cake
- Place 2 tablespoons of raspberry jam into a bowl and add a teaspoon of water and stir to combine and loosen the jam. Remove the frosting from the fridge and briefly stir
- Place one of the raspberry sponges on a serving plate or cake stand and spread with half the jam mixture. The spread with a little of the frosting. Place the white chocolate cake on top then spread this with the remaining jam and some of the frosting before placing the second raspberry layer on top.
To frost the cake
- Spread a thin layer of frosting over the top and sides of the cake. Place the cake into the fridge for half an hour to allow the frosting to firm up. Apply the remaining frosting to the top and sides of the cake and spread smooth. Then leave plan or use a notched cake scraper to add a little pattern to the frosting on the sides.
To complete
- Melt 50g (2oz) white chocolate in a heatproof bowl over hot water.
- Push three straws very close together or a cake dowel into the cake, at a slight angle. Use a narrow piece of cellotape to secure the three exposed straw tips. Brush the exposed straws (dowel) with the melted chocolate. Paint a small amount of white chocolate to a jelly bean's surface use the chocolate to stick the bean to the base of the straw where it emerges from the cake. Gradually add two or three more jelly beans around the base of the straw. Allow the white chocolate 'glue' to dry for a few minutes before building up the layers of sweet on the straw. Whilst those on the straw are drying, start to apply a few to the top of the cake. You may want to have some overflowing the side of the cake too.
- Place tissue paper into the jelly bean container. Position the container in the illusion so that the straws sit inside the sweet container.
- Enjoy!
Notes
Never want to miss a recipe?
Subscribe to my newsletter Recipe Crumbs for all my latest recipes, posts and more straight into your inbox.
Kristina Trick says
I'd love to make bundt cakes using the mould and display them on the beautiful plate
Angela - Only Crumbs Remain says
Hahahah, that sounds very familiar to me 🙂
Angela x
Susan B says
I would use items 4 and 5 as I recently disposed of my old icing bag and nozzles. The children and I will make a couple of cakes this Easter so we would use the items to decorate what we make.
Angela - Only Crumbs Remain says
Sounds like you have a fun baking session planned.
Angela x
Helen at Casa Costello says
I love the sound of this raspberry & white chocolate cake - Your way of constructing an illusion cake is great too! Thanks for joining in with #Bakeoftheweek
donna jones says
mini bundt mould first and make some lemon drizzle cakes
cheryl price says
I would use the icing bags and practice my swirly icing
Angela - Only Crumbs Remain says
Thank you Vicki 🙂
Thanks for hosting,
Angela x
Angela - Only Crumbs Remain says
I hope you enjoy them as much as we did if you're lucky enough to win Kim,
Angela x
Corinna Ball says
I would use the cupcake cookie cutter to make cinnamon biscuits. My daughter loves stamping out the shapes and decorating them after.
peter campbell says
would use the cake tester/skewer for when I make a banana cake
rachael mccadden says
I'd use the cupcake cases and make choc cuocakes
Angela - Only Crumbs Remain says
Lovely, I bet they'll soon be gobbled up 🙂
Angela x
Michelle Ferguson says
I'd use the cupcake cases first and make some lemon butterfly cakes
Angela - Only Crumbs Remain says
Such a classic bake, but with a delicious added flavour,
Angela x
Hannah Ingham says
I'd use the cake tester as I plan on making a chocolate cake soon that I'll be shaping into a hedgehog for a friends birthday!
Angela - Only Crumbs Remain says
Ooh wow, lucky friend!
Angela x
Carole Nott says
i would use the paper cases and make my favourite chocolate cupcakes
Angela - Only Crumbs Remain says
Sounds delicious,
Angela x
Sarah Trivuncic says
Been meaning to try out one of these vertical pouring cakes, they look such fun! Thanks for joining in with #BAKEoftheWEEK !
Jenny says
what a fabulous looking cake! x
Midgie says
This looks gorgeous, Ive always wanted to try a cake like this but really don't think I have the patience!
Angela - Only Crumbs Remain says
Thank you Midgie, I think if you're organised it's not too demanding plus if you use slightly larger sweets like the maltesers, which are often used, you probably wouldn't need to 'glue' quite so many on making the whole process a tad quicker.
Angela x
Shaheen says
Your cake is amazing, nice change from the maltesers!
Eb Gargano says
I absolutely love your gravity defying cake - it looks amazing! 🙂