To get a perfect finish when working with chocolate you will need to know how to temper it. The seeding method is probably the simplest method to use at home and is easy when you know how.

What is tempering chocolate?
Tempering chocolate is the process of heating and cooling chocolate so that it sets to a crisp, shiny finish. It gives chocolate that characteristic snap when you bite into it. Untempered chocolate has no "bite", will look dull, and may develop a bloom (spotty dull white colour) which spoils the appearance.
Tempered chocolate will not melt at a cool room temperature. Tempered chocolate will shrink slightly and release from moulds easily. So it is particularly important when making moulded chocolates such as my Raspberry cream white chocolates, Coffee cream chocolates, Hazelnut noisette chocolate and homemade Easter eggs. It will also be glossy when it hardens against a shiny surface such as a polycarbonate mould.
Chocolate can be tempered in a number of ways. Traditionally, the chocolate would be heated to the correct temperature and then cooled by spreading it backwards and forwards on a marble board. Needless to say this is not easy and has the potential to be very messy.
I find the easiest way to temper chocolate at home is by following a process called "seeding". Melt about two-thirds to three-quarters of the chocolate slowly over a low heat. Once it is melted, remove from the heat and add the remaining chocolate and stir until it melts. This will cool the chocolate and it will begin to thicken. The "seed" chocolate not only cools the chocolate but helps set the molecules in the chocolate into the correct crystalline structure that gives the chocolate it's characteristic snap.
How to Temper chocolate by the seeding method
Step 1
Bring a saucepan with a couple of inches of water to a simmer over a medium low heat. Place a bowl on the pan, making sure its base doesn't touch the water.
Step 2
Place about three quarters of your finely chopped chocolate into the bowl. Melt the chocolate while stirring constantly. The chocolate should reach a temperature of between 45/48°C (113/118°F) for milk and white chocolate and 53/55°C (127/131°F) for dark chocolate. It will be quite runny at this stage. You can keep it at this temperature for some time should you wish.
Step 3
When you are ready to start working with your chocolate, remove the bowl from the heat and wipe the base of the bowl. Although the bowl was not touching the water, it will be wet from steam. If any moisture gets into the chocolate it will seize, become grainy and cannot be rescued. Getting into the habit of immediately wiping the base is good practice and will help prevent disasters.
Step 4
Add the remaining chocolate. Stir vigorously, breaking the chocolate down with the spatula until all the chocolate has melted.
The chocolate should cool to between 27/28°C (80/82°F) for milk and white chocolate, 28/29°C (82/84°F)for dark chocolate.
Step 5
At this point it will be quite thick and viscous, so needs to be gently rewarmed to a working temperature. Place the bowl back on top of the saucepan of water and heat very gently whilst stirring to 29/30°C (84-86°F) for milk and white chocolate, 31/32°C (87/89°F) for dark chocolate. There may be enough heat left in the water without returning the pan to the heat. Take care not to overheat the chocolate at this point.
Test the chocolate to check it is tempered correctly by drizzling a small amount on a palette knife. It should set hard within 5 minutes and have a nice sheen.
The poorly tempered chocolate shown here on the left palette knife is dull and soft. The tempered chocolate on the right hand palette knife is shiny and set hard.
Hints and tips when tempering chocolate
- While using a thermometer is not essential, it helps to take the guess work out of the process. I have used a Thermapen thermometer for several years now and have found it very reliable.
- Before you start, make sure all of your equipment is completely clean and dry. As mentioned above, water is the enemy of chocolate. Make sure your hands are dry too and do not be tempted to lick your fingers while you work.
- It is always easier to temper and work more chocolate than you need. The reason being that it is easier to control the temperature of the chocolate when you have a larger quantity. A small amount can overheat very quickly. When filling moulds and dipping truffles it is far easier if you've got more than enough. When you have to start scraping around for every last bit of chocolate things can quite literally get messy and can spoil the end result.
- NEVER hurry the melting process. You can even leave the chocolate melted for several hours before beginning the cooling process. Although you might not want to leave it that long, it is essential that you let the chocolate melt slowly.
- Place the chocolate in a bowl over a pan of hot water, making sure the water is not touching the base of the bowl as this may cause the chocolate to become too hot.
- The type of bowl you use will affect the process. I generally use metal bowls. They conduct the heat very well but get very hot very quickly so if you use one you will need to take care not to let the chocolate overheat. I remove the saucepan pan from the heat source during the melting process and only return it to the heat if absolutely necessary. On the upside, when it comes to the cooling part of the process the bowl does not retain its heat and can help speed up the cooling.
- Glass bowls are less prone to quick fluctuations of temperature, so are less likely to overheat the chocolate. On the downside, they retain the heat for longer so the cooling process is slower.
- While you can leave the chocolate in its melted state for some time, once it has been tempered it sets much more quickly than chocolate that has simply been melted. Get everything you need together before you start to cool the chocolate.
- If the chocolate starts to harden before you have finished working with it, quickly pop it back onto the heat to very slightly warm through until workable again. You will be fine doing this once or possibly twice but do try to work quickly and efficiently for best results.
- Because chocolate is affected by both heat and moisture try to work in cool dry conditions. If Your kitchen is very hot and steamy it will be very hard to get good results. Cold damp days can also be a problem.
Can I reheat tempered chocolate?
If the chocolate cools too much and becomes too thick to work with you do not need to completely restart the tempering process from the beginning.
As it thickens you can warm it again either by placing it back over the pan of hot water briefly or by adding more warm untempered melted chocolate. (Your tempered chocolate will act as a seed to temper the newly added untempered chocolate).
Just be careful that you don't overheat the chocolate or the temper will be lost.
Can I use a microwave to temper chocolate?
If I'm melting chocolate that doesn't need to be tempered for example to go into a cake, or to make a cheesecake or mousse, I use the microwave because it is quicker and more convenient, although that does mean you still need to take care not to overheat the chocolate.
For any recipe where you need a good finish to the chocolate, I strongly recommend against using the microwave and melt on a low heat as above.
Can I temper the chocolate more than once?
Unused chocolate can be tipped onto a piece of baking parchment and allowed to set. Wrapped and stored in a cool dry place it will keep for a few months and can be tempered again when required. Melt the chocolate as above but add some new chocolate to the melted chocolate to aid the seeding process. You can also do this with chocolate that did not temper properly the first time.
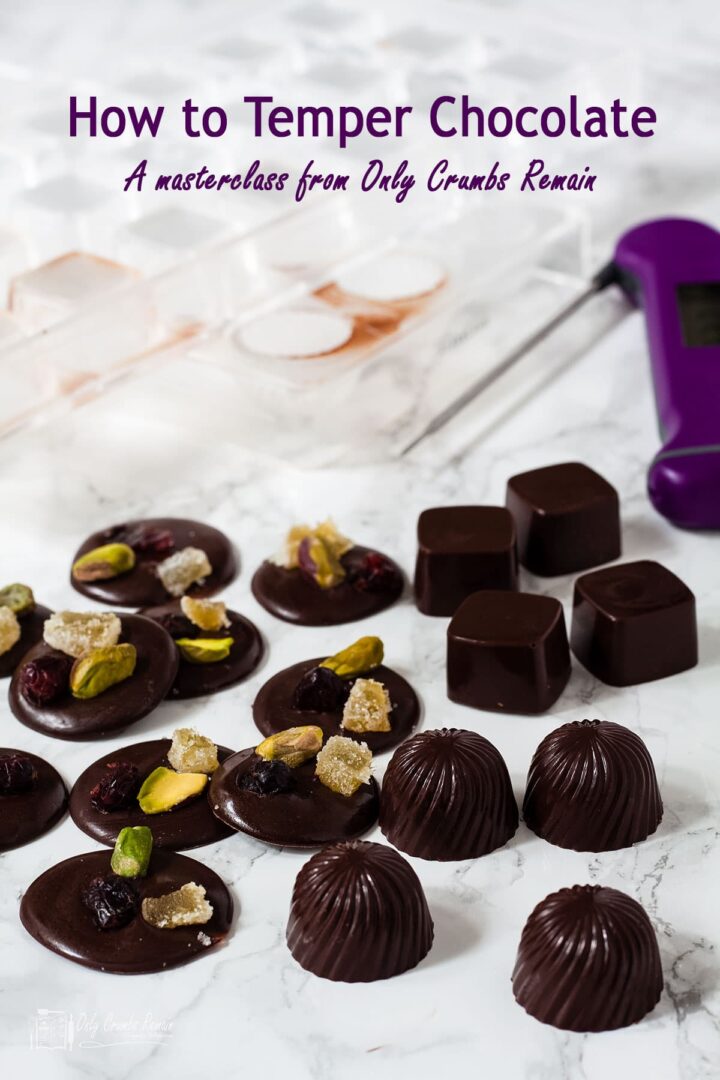
Do not try to temper chocolate that has been used for dipping. Instead, use this for ganache or in bakes. Or if you only have a little leftover you could make Mendiants (small chocolate discs topped with fruit or nuts).
Why are milk and white chocolates harder to temper than plain?
White and milk chocolate contains milk fat along with the cocoa butter. Milk fat crystallizes differently to cocoa butter and makes tempering white and milk chocolate harder than tempering dark chocolate.
When moulding with white chocolate, make sure you test the temper of your chocolate and don't start moulding until you are sure the chocolate is in temper, otherwise your chocolate will not harden and will not turn out. Usually, you want a nice thin shell when you are moulding with dark chocolate, but with white chocolate, a thicker shell will give a better result.
You can set white chocolate in the refrigerator but only leave it sufficiently long enough to set. Chocolate left in the refrigerator for any length of time will bloom or have a dull finish because of the moisture in the fridge.
Stewart Chantrey says
Hi Jacqueline,
When I make florentines I temper the plain (dark) chocolate but after setting on the biscuit and drying I always get swirling which imo spoils the look. Also do you find that this delicious biscuit is sticky to touch at all times. Any advice would be great. Thank you.
Jacqueline Bellefontaine says
Umm given the 2nd part of your question it sounds like it may be moisture causing the streaking in the chocolate. If your chocolate is tempered correctly (lots of tips here https://onlycrumbsremain.com/how-to-temper-chocolate-masterclass/ ) then it shouldn't streak. Florentines should not be sticky as such yes hair fluff might stock to them but they should not be sticky I that they will stick to your fingers. I can only think that maybe they are just a tad undercooked. If they were really sticky and a bit wet then it could be why you are getting streaky chocolate. Hope this helps
Veronica says
This is such an informative post - I've always steered clear of anything like this because I thought it was a fiddly process - you've just made it crystal clear. Thanks for sharing - I can't wait to try this out.
Jacqueline Bellefontaine says
Even if you don't go the full hog and use a thermometer holding back some of the chocolate and adding to melted chocolate will really up your game. Ive now done it so many time I can usually judge by the feel of the chocolate as I stir it so dont be put off practice makes perfect and you won't look back.
Jhuls @ The Not So Creative Cook says
Jacqui, this post is amazing!! I was just thinking last night how to temper chocolate and this post is so helpful. Bookmarking this so I could do it in the future. The ones you did look so perfect!! Thank you very much for sharing!
Jacqueline Bellefontaine says
So pleased you find it useful. I did a lot of Chocolate work when I was working on Something sweet magazine. I still got it wrong occasionally chocolate can be a fickle ingredient but knowing the basics is really helpful ad a thememoter can help take out some of the guess work.