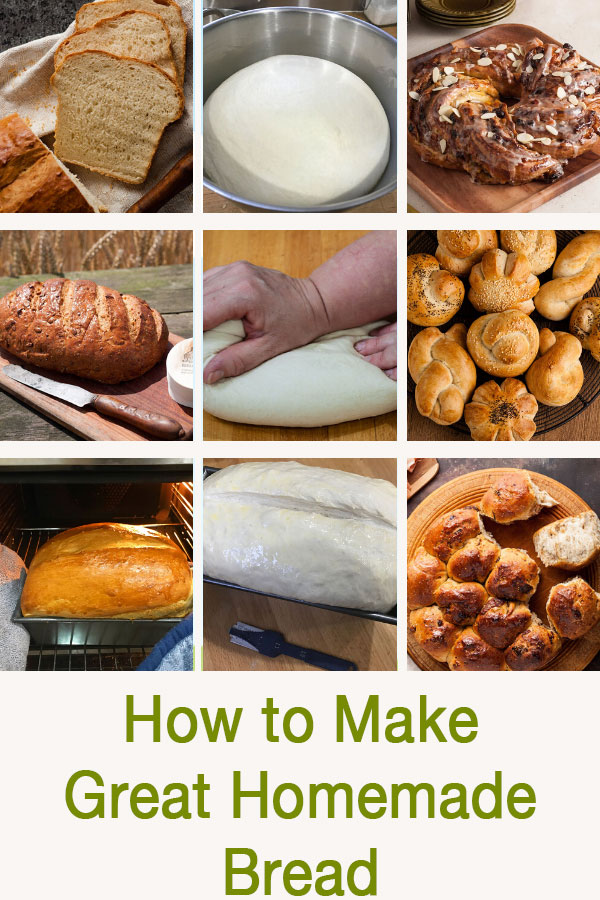
Making bread at home seems to have a bit of a reputation for being much more difficult than it really is. While it does require a little planning and patience waiting for yeasted breads, most of that time the bread is left alone to rise and prove leaving you free to do other things.

As the daughter of a master baker, I love good bread, the flavour and texture being far superior to anything that is mass produced. This guide to bread and yeast cookery aims to give you the key points to make great bread at home.
With a little practice, you will soon be rewarded. Not only will you be producing great tasting bread, you will have the added bonus of a house filled with the amazing smell of freshly baked bread!
The basic bread ingredients:
Bread flour:
Flour is the principle ingredient used in bread making. When making bread it is essential that you use a flour labelled "strong" or "bread" flour. These have a high gluten content ( more on that further down) and it is this that is required to form the texture and structure of breads. Plain or self-raising flour has a lower gluten content and will not work.
GLUTEN
Bread flour is different to the flours we use for pastry and cake sponges because it contains far more gluten. Gluten is actually formed by a combination of two proteins gliadin and glutenin. Strong bread flours have a higher proportion of these proteins than softer flours. These proteins when hydrated bond with each other to create the larger protein gluten which when developed during the kneading process gives the bread its structure.
Wholemeal flour is made by milling the entire wheat kernel and includes the bran and germ. Brown flour has 10 to 15% of the wheat grain removed during milling. They produce a denser and smaller loaf than those made with white flour, this is because the gluten strands are cut by the edges of the bran flakes and germ. The flours are also rich in minerals which inhibits the fermentation of the yeast.
Other flours such as rye, spelt and buckwheat flour which have a low gluten content can be added to bread for a different flavour and texture but must be used in small quantities with a strong bread flour . Flour is best stored in a cool, dry dark place.
Be aware that bread making can never be an exact process as different flours will require a slightly different amount of liquid to achieve the desired dough; even a white flour grown from wheat in Canada will need a slightly different volume of water to that grown in the USA or UK for instance.
Milling, how long for and where the flour is stored and even the weather can also affect the amount of water required.
Don't let this put you off, there's not too much difference and it all comes down to practice as with most things in life. The more you make bread the sooner you will get to know the feel of a dough made with the right degree of hydration.
Tip: Use the correct type of flour; using a pastry flour to make bread just won't work as effectively because of the lower gluten content. Look for the words "strong" or "bread" on the packet.
Salt:
Salt not only adds flavour to bread it helps to regulate the yeast and strengthens the gluten structure. Too little and the loaf will have a poor structure, and flavour. Too much salt can impair the yeast and if it comes into direct content can even kill it, resulting in a loaf with poor volume and flavour. For this reason, it is best to always use the amount of salt stated on a recipe.
Tip: When measuring the salt, keep it to the opposite side of the bowl to the yeast and only start combining when you are ready. This way, the actual direct contact time between the salt and yeast is minimal.
Yeast:
Breads are best divided into two types, those made with yeast and those without.
Yeastless breads include quick breads such as Soda Bread (which rises due to the reaction between the acid in the buttermilk and the alkaline of bicarbonate of soda which produces CO2), some flatbreads and cornbreads.
Yeast, is the most common raising agent when it comes to making bread. It is a living organism that when active creates carbon dioxide. The tiny bubbles of carbon dioxide are trapped in the structure of the dough giving bread its characteristic structure.
Fresh yeast:
Fresh yeast can be hard to source now. Some health food stores and independent bakeries may sell it and it is also available online. I got mine through my supermarket delivery. It needs to be stored in the fridge and will keep for a few days. It can also be frozen for up to 3 months. It activates quickly and tends to stay active for longer.
I love the smell of fresh yeast and sometimes bake with it just because it brings back memories of helping in the family bakery as a child. Fresh yeast is usually blended with a little sugar and liquid and allowed to froth before adding to the dough. However, I later discovered you could rub the fresh yeast into the flour as you would rub in butter avoiding this extra step.
Dried yeast:
These days The most readily available yeast for the home baker is dried yeast, which lasts so much longer, but still has a life span so do check the use-by date. Available in two forms
Regular dried yeast needs to be activated by adding it to your warm measured water with a little sugar to feed it. The yeast will eventually start to froth and this is the stage when you can add it to your flour and make your dough.
Easy bake yeast also known as easy-blend, fast-acting yeast or instant dried yeast, can be added straight to your flour; this is the yeast I tend to use.
Tip: When using fast-action yeast, the first rising and knocking back can be eliminated if time is short, although personally I find you get a better result if you do both risings.
Yeast works quickest in warm temperature hence it helps to have a warm kitchen. At low temperatures, yeast will continue to work at a much slower rate therefore you can make and shape bread and leave it in the refrigerator to rise overnight and return to room temperature before baking.
Many people think bread that has a slower low-temperature proving produces a loaf of a superior result.
While not requiring the addition of commercial yeasts, sourdough breads, are classified as yeasted bread as they use the natural yeasts in the sourdough starter to leaven the bread. Check out my recipe for No-knead sourdough bread on Recipes Made Easy.
Water:
Water is added to your flour, salt & yeast to make the dough. It's important not to use water any hotter than lukewarm (blood temperature) as if it is too hot it can kill the yeast.
Water that it is at blood temperature (feels neither hot nor cold to the touch) is the optimum temperature for the yeast to be active. You can in fact use cold water to make your bread dough; the dough will still prove but will take longer.
Tip: If you're unsure about whether the temperature of your water is right, err on the side of caution and use cooler water. Milk is often used in enriched breads, and the same temperature rules apply to milk as they do to water.
As already mentioned the amount of water required may vary slightly. In general, I prefer to make my dough on the wetter side. It is easy to knead in a little extra flour if the dough remains too wet and sticky after kneading.
But it is much harder to mix in extra water once you have formed the dough and the gluten has started to develop.
Other bread ingredients:
Fats
Often a little fat is added to bread these tenderise bread, add flavour and richness and contribute to the keeping qualities of bread. Any fat or oil can be used, I generally like to use olive oil or butter depending on the flavour required.
Bread can be flavoured with so many different ingredients; fruit, nuts, seeds, herbs, coconut to list a few. These flavours are often added during the shaping stage as the weight of some of the ingredients can drastically slow the time it takes to prove the dough.
Sugar
A little sugar speeds up the action of the yeast as well as affecting the keeping quality of the bread by helping to retain moisture. My preferred choice is either caster sugar (I like to use golden caster which is a less refined sugar) or light muscovado sugar for added flavour but most sugars can be used. Honey can also be used for flavour.
Enriched dough:
Enriched dough is one of my favourite types of bread to make and eat! The dough is enriched by using varying combinations of milk, butter, egg and sugar. Once you're confident with making a regular loaf of bread, you must try making an enriched bread.
Sugar in small amounts will speed up the action of yeast but in larger amounts will inhibit the growth of yeast. The addition of extra fat will also inhibit the growth of the yeast. Once you get into the larger quantities used in enriched doughs to overcome these effect you will need to allow additional time for rising. Two hours or more is not unusual. Extra yeast is sometimes added to help speed things along.
Bread with a high sugar content will get a darker crust when baked.
Making bread dough
Mixing
Place the flour in a mixing bowl and add the salt to one side and the yeast (if using dried yeast) to the other then stir to combine. Make a well in the centre of the flour and add the liquid. Mix to a soft and slightly sticky dough.
Place the flour yeast and salt in the bowl. Add the liquid. Mix on low speed to form a soft dough. Increase speed slightly and knead in the machine for 3-4 minutes.
The dough will become less sticky as the gluten is developed during the kneading stage. If you make the dough too dry at this stage you will end up with a dense and heavy loaf. You can always knead in some extra flour later if required.
Tip: If you are making and kneading the dough by hand you can save on washing up by making the dough directly on the work surface. Tip the flour into a pile on the work surface, mix in the yeast and salt. Use your hand to make a circle of flour with no gaps then pour the liquid into the centre.
Then slowly pull in the flour while mixing with your hands, continue until all the flour is blended into the liquid to form the dough then start kneading.
Addyeast and salt to flour and mix together. Make well in centre add the liquid, Start to draw in the flour. Continue mixing in the flour. Mix to a sticky dough knead the bread for 10 minutes.
Kneading:
Kneading is the process of working the dough to develop the gluten. There's no 'right' or 'wrong' way of doing it; it's just whatever works for you. Basically you will be pulling and stretching the dough. Hold the dough with one hand and use the other to push and stretch the dough away from you.
Turn the ball of dough every few stretches so you that you are mixing and kneading all of it. If you're hand kneading you're looking to knead the dough for about 10 minutes; in a stand mixer with a dough hook about 3 to 4 minutes.
As you knead the dough, you will notice that it gradually becomes smooth and more elastic in nature. It will also become less sticky and will 'clean' the excess dough off your hands as you continue to knead.
When the dough is ready you will be able to lift the dough in your hands without it sagging between your fingers. This means that the gluten has developed sufficiently to hold its shape. It feels very different to the unkneaded lump of dough you started with.
Tip: Try to only add extra flour if your dough really feels too wet, as this will alter the ratio between your flour, salt and yeast and may result in a dense heavy loaf.
First Prove:
The word 'prove' simply means that we are 'proving' that the yeast works. The first prove allows the bread to develop its flavour and structure. The dough creates carbon dioxide bubbles which are the bread's air pockets and helps it to rise.
This initial proving time needs to be at least an hour. You can hurry this along by placing the bread in a warm place such as a sunny spot in the kitchen or near a radiator.
But the longer you can leave it the better the flavour will be so if you have the time you can leave it in a cooler place to rise or even in the refrigerator where it will take about 10+ hours to rise perfect for leaving overnight to finish in the morning.
The dough needs to be put into a clean bowl, greased with a little oil and covered to prevent a 'skin' developing and impairing the rise. I use to use a shower cap for this, rather than cling film. The shower cap can then be used again and again. I now have a clear glass saucepan lid that happens to fit my medium mixing bowl perfectly so I use that instead.
The dough is ready to continue when it has doubled in size.
If you are proving the dough in a clear glass or plastic bowl, you will be able to see the 'honeycomb' structure as the dough rises and the air pockets expand.
Knocking Back:
At this point most bread doughs need to be 'knocked back'. This process helps to reduce big air pockets and redistribute them evenly throughout the dough. Tip the dough onto a lightly floured surface and fold it in on itself repeatedly a few times.
Shaping The Dough:
This stage, as the title suggests, is where the dough is shaped into the final form; be that a bread roll, braided or regular loaf. Additional ingredients such as fruit and nuts can also be kneaded in at this stage before shaping.
Second Prove:
The second prove is quicker than the first. It's the final rising stage and allows the yeast to continue to produce carbon dioxide and therefore increase in size. The shaped dough is again covered, I pop mine into a large clean plastic bag (such as a large carrier bag or small bin liner), again I keep one just for this purpose so that I can use it time and again.
This time the dough should always be placed in a warm position. The dough is ready to bake when it has increased insize and it springs back after gently pressing it.
If the dough has been over proved it begins to crease and slump. If this happens it is best to knock it back again and re-shape it.
Glazes for breads
Most breads are finished with a glaze or topping before baking. Each giving a slightly different appearance to the finished bread.
In addition bread may also be sprinkled with ingredients such as seeds, flour, oats or cornmeal add flavour and texture to the crust.
- Melted butter
- Milk
- Beaten egg yolk
- Beaten egg white and sugar
- Water
- Beaten egg white
- Un-glazed
- Flour
- Beaten egg
Some sweet breads can be glazed after baking with a brushing of honey or sugar syrup.
Baking:
The bread is baked in the oven. To create a crusty loaf steam is needed within the oven. To achieve this, place a shallow oven tray on the bottom shelf warming as the oven is preheated.
Then, when the bread dough is placed in the oven, quickly pour a large glass of water into the heated tray and quickly closed the oven door. Avoid re-opening the oven door for at least 5 minutes. The tray may need topping up with water after 10 minutes.
Once the dough has baked for the specified time, check to see if the bread is ready. To do this tap the base of the bread and if it sounds hollow the bread is ready and can be removed from the oven and cooled on a cooling rack. If not, place it back in the oven directly on the oven shelf for a further few minutes before retesting.
Remove the bread from the pan as soon as possible after baking and place on a wire rack to cool. This will prevent the bread from sweating in the tin and getting a soggy crust.
Allow the bread to cool before slicing, cutting bread fresh from the oven may be difficult.
To store bread, allow to cool completely at room temperature, wrap in foil or a plastic bag. Bread will last if well covered for up to 3 days but for the best flavour try to consume your bread as soon as possible.
Do not store bread in the refrigerator this has a drying effect on the bread.
Bread can be frozen for up to 6 months although the flavour may deteriorate over time. Defrost at room temperature.
What went wrong?
If you find that the loaf is not as perfect as had hope do not despair. Remember there is a certain charm to the variations of homemade bread. Whilst it might not look always look perfect or texture may vary, more often than not it will still taste delicious.
The bread did not rise enough
- Too little yeast
- Too little sugar
- Too much salt or the yeast has come into contact with the salt before mixing
- Yeast activated too soon by being in contact with the liquids
- The yeast is out of date
Bread has sunk in the centre
- Too much liquid
- No salt or too little salt
- Too much yeast
Poor Crust
- Loaf left in the tin too long before turning out to cool on a rack
- Loaf wrapped whilst still warm
Crust too dark
- Too much sugar choose a light crust setting for sweet breads
- Texture too dense
- Not enough liquid
Centre is soggy/uncooked
- Too much liquid or too many "wet" ingredients.
- Too much rich ingredients such as nuts or other grains
Bread Rises too much
- Too much yeast
- Too little salt
What can I make from the basic white bread dough?
In addition to making a basic loaf you can experiment with different shape loaves, use the dough to make pizza bases or why not try your hand at making some Fancy dinner rolls.
📖 Recipe
Basic White Bread Dough
Equipment
- stand mixer + dough hook (optional)
Ingredients
- 600 g (1lb 6oz) strong white bread flour
- 1½ teaspoon salt
- 1½ teaspoon fast-acting dried yeast
- 350 ml (11floz) water
Instructions
- Place 600g (1lb 6oz)strong white bread flour in a large mixing bowl. Add 1 ½ teaspoon salt to one side of the bowl and 1 ½ teaspoon yeast to the other side and stir to combine. Make a well in the centre and add 350ml (11 floz) lukewarm water and mix to a slightly sticky dough.
- Turn out onto a work surface and knead the dough for about 10 minutes until most of the stickiness is gone. If using a stand mixer attach the dough hook and knead at a medium to low speed for about 3-4 minutes. Place in an oiled bowl, cover and leave in a warm place until doubled in size (about 1 ½ hours).
- Once the dough has doubled in size, knock back and turn out onto a work surface. Lightly knead, then shape and use as required.
To make a large loaf
- Once the dough has doubled in size, knock back and turn out onto a work surface. Lightly knead and shape into an oblong. Place in an oiled 900g (2lb) loaf tin.
- Cut one large slash along the length of the loaf with a sharp knife. Cover loosely or slip inside a large carrier bag and leave in a warm place for about 1 hour until well risen.
- Preheat the oven to 210℃ (190℃ fan)/425°F/gas mark7. Brush with beaten egg to glaze and bake in the centre of the oven for 40-50 minutes or until the loaf sounds hollow when tapped on the bottom.
- Transfer to a wire rack to cool.
Notes
Left over bread?
After all that work its a shame to throw away any left over bread. (Although trust me when you make your won it tastes so good there tends to be less left over.)
Make bread crumbs - cut into chunks (remove hard crusts first) and blitz into breadcrumbs in a food processor. store in the freezer so you always have fresh breadcrumbs on hand when require.
or try making one of these
- Bread sauce - Taste Botanical
- Quick apple Puddings - Fab Food for All
- Ribolata - Tin and Thyme
- Rye bread and black currant cake - Tin and Thyme
Julia says
Love this recipe! Made these rolls for thanksgiving and Christmas. They are delicious and easy and you can be creative with how to tie the knots! We did figure 8’s lassos braids! It was a blast!
Jacqueline Bellefontaine says
So happy to read this comment, hearing abouit you having fun making bread brings a smile to my face.
Kate - Gluten Free Alchemist says
What an interesting read! Even from a gluten free perspective, I learnt loads! So helpful. Thank you x
Jacqueline Bellefontaine says
Thanks, Kate, I'm glad you found it useful
Lesley Garden says
I love making my own bread and make about 3 loaves a week. I’ll add this lovely bread if yours to my list.
Jacqueline Bellefontaine says
Fab it sure is useful when you need a loaf quick
Jenny Walters says
What an epic post Jacqui. Being an avid baker I loved your post and learnt a lot. I too am an enriched dough gal and I think enjoy baking with yeast the most out of all my baking. Yet it took me about 20 tries before I really got it! I wish I had had this brilliant post to guide me! Thank you so much for linking to #BakingCrumbs
Jacqueline Bellefontaine says
Thank you Jenny. It felt a bit of an epic to write but a few pointers are always helpful. I am amazed at how so many people are put off even trying to cook with yeastas they think it is so hard. A good recipe and a bit of practise is all that's required, It to me is by far the most rewarding form of baking as it beat anything mass produced hands down!
Rosemary says
This is such a great step-by-step guide. I have very rarely made bread (except in a bread-maker, which isn't quite the same thing!) but am definitely inspired to give it a go.
Jacqueline Bellefontaine says
Homemade bread in a bread machine is the next best thing. I've written a book of 100 bread machine recipes so have plenty of practice. But I do like to get my hand in too as I feel bread making is quite therapeutic.
Jane says
You say about putting a tray with water in the bottom of the oven when you cook the loaf. Do you recommend doing the same when I make rolls with the dough. many thanks. Jane
Jacqueline Bellefontaine says
Yes if you want crusty rolls.