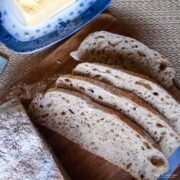
No Knead Bread
The bread is no-fuss to make and requires only a few short minutes of hands-on time. The long prove results in a flavoursome well-aerated loaf.
Servings: 1 loaf
Equipment
- small dutch oven or
- 20cm (8in) deep round cake tin
- clean tea towel dampened and wrung out well
Ingredients
- 300 g (12oz) strong white bread flour
- 125 g (4oz)strong wholemeal bread flour plus extra for dusting
- 1 teaspoon salt
- ⅓ teaspoon dried yeast
- 300 ml (12floz) water
- Butter or oil for greasing
Instructions
Make the bread dough
- Place 300g white and 125g wholemeal bread flour in a good size bowl. Add I teaspoon of salt to one side of the bowl and ⅓ teaspoon yeast to the other. Combine with your hand or wooden spoon. Make a well in the flour. Pour in 300ml of the water. With your hand mix ttogetheruntil you have soft and sticky dough.
Proove
- Cover the bowl and place in the fridge or somewhere cool but draft fee. Allow to prove for about 24 hours or until doubled in size (though the time will depend upon exteranal temperature).
- Prepare to shape. Place a large baking tray or chopping / preparation board on the work surface. Lay the clean tea towel over it. Liberally dust the tea towel and top of the dough with flour. Without knocking back the dough, use a dough scraper or spatula to carefully scrape around the side of the bowl and tip the aerated dough onto the floured tea towel.
Shape
- Carefully lift one side of the dough and gently lay it so that the raw edge is running down the centre of the dough. Repeat with the other side of the dough, again laying it so that the raw edge is running down the centre of the dough and butting up to the left side.
- Next, repeat with the remaining sides to form a roundish shape. Turn out into a well-greased tin or Dutch oven.
Leave to Rise
- Cover with a clean damp tea towel and allow to rise a room temperature for about 2 hours.
Bake
- Pre-heat the oven. Preheat the oven to 220℃ (200℃ Fan)/425°F/gas mark 8.
- If baking in a cake tin, cover with a double sheet of foil. Place the bread in the centre of the oven and bake for 20 minutes. Remove the tin foil or lid and bake for a further 15 minutes. Carefully tip the bread out of the cake tin and tap the base of the bread. It should sound hollow. If not, place the bread directly onto the oven shelf and bake for a further 5 minutes, or until it sounds hollow.
- Place on a cooling rack to cool, then enjoy!
Notes
Cook's Tips:
- The salt and yeast are placed on different sides of the bowl because if they come in direct contact the salt will inhibit the growth of the yeast.
- When proving the bread to avoid excessive use of cling wrap cover with a disposable shower cap (the type you pick up at hotels). These can be used again and again.
- More flavour is created in the bread by slowly proving and it cuts out the effort required to knead bread made the conventional way.
- The bread will keep for 1-2 days