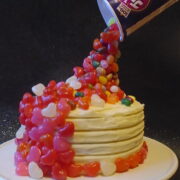
Jelly bean illusion cake
Jelly beans spill from a suspended tub in this fun anti-gravity cake thats surprisingly easy to make.
Servings: 12
Equipment
- 2 x 18cm ( 7") sandwich cake tins
- 3 straws or a cake dowel
- small strip of narrow sellotape
- Small paint brush, reserved for food use only
- Tissue Paper
- Jelly bean cup or bag
Ingredients
Raspberry sponge
- 150 g (5oz) butter , softened (plus a little extra for preparing the tins)
- 150 g (5oz)golden caster sugar
- 4 medium eggs beaten
- 1 teaspoon raspberry flavouring extract
- Red food colouring (optional)
- 150 g (5oz) self raising flour Plus a little extra for preparing the tins
- 2 tablespoon natural yoghurt or milk
White chocolate sponge
- 25 g (1oz) white chocolate
- 75 g (3oz) butter , softened (plus a little extra for preparing the tin)
- 75 g (3oz) golden caster sugar
- 1 teaspoon Vanilla Extract
- 2 medium Eggs beaten
- 75 g (3oz) self raising flour Plus a little extra for preparing the tins
Frosting
- 400 g (14oz) white chocolate
- 400 g (14oz) mascarpone
To complete
- 2 tablespoon seedless raspberry jam
- 50 g (2oz) white chocolate
- 500 g (1lb 2oz)Jelly beans
Instructions
- Preheat the oven to 180℃ (160℃ fan)/350°F/gas mark 4. Grease the base and side of two sandwich tins. Place a teaspoon of flour into one of the tins. Rock the tin around so that all of the greased surfaces are covered in flour. Knock the excess into the second tin and again distribute the flour in the same way. Tip out any excess flour.
Make the raspberry sponge layers
- Beat together 150g (5oz) butter and 150g (5oz) sugar until very pale and fluffy. Gradually add 4 beaten eggs a little at a time, beating well after each addition. Add 1 teaspoon raspberry flavouring and beat again. Then add a little food colouring and mix well.
- Sift in 150g (5oz) flour and gently fold, then fold in 2 tablespoons yogurt or milk and mix to combine. Divide the mixture between the two prepared sandwich tins and spread level . Bake for about 22 - 25 minutes or until springy to the touch. Cool in the tins for 5 minutes before transferring to a wire rack to cool completely.
TOo make the white chocolate sponge layer
- Prepare the third cake tin as before. Melt 425g (15oz) white chocolate in a heat proof bowl over a pan of hot water. Once the chocolate has almost melted remove it from the heat and stir until completely melted. Set aside to cool for 5 minutes.
- Beat together 75g (3oz) butter and 75g (3oz) sugar until very pale and fluffy. Gradually add 2 beaten eggs a little at a time, beating well after each addition. Sift in 75g (3oz) flour and gently fold in , then fold in 2 tablespoons of the melted white chocolate and mix to combine. Pour into the prepared sandwich tin and spread level . Bake for about 22 - 25 minutes or until springy to the touch. Cool in the tins for 5 minutes before transferring to a wire rack to cool completely.
Meanwhile make the frosting.
- Tip 400g (14oz) mascarpone into a bowl and stir briefly stir it to soften. Pour in the remaining cooled melted white chocolate and mix well. Cover and place in the fridge to firm up for about two hours.
To assemble the cake
- Place 2 tablespoons of raspberry jam into a bowl and add a teaspoon of water and stir to combine and loosen the jam. Remove the frosting from the fridge and briefly stir
- Place one of the raspberry sponges on a serving plate or cake stand and spread with half the jam mixture. The spread with a little of the frosting. Place the white chocolate cake on top then spread this with the remaining jam and some of the frosting before placing the second raspberry layer on top.
To frost the cake
- Spread a thin layer of frosting over the top and sides of the cake. Place the cake into the fridge for half an hour to allow the frosting to firm up. Apply the remaining frosting to the top and sides of the cake and spread smooth. Then leave plan or use a notched cake scraper to add a little pattern to the frosting on the sides.
To complete
- Melt 50g (2oz) white chocolate in a heatproof bowl over hot water.
- Push three straws very close together or a cake dowel into the cake, at a slight angle. Use a narrow piece of cellotape to secure the three exposed straw tips. Brush the exposed straws (dowel) with the melted chocolate. Paint a small amount of white chocolate to a jelly bean's surface use the chocolate to stick the bean to the base of the straw where it emerges from the cake. Gradually add two or three more jelly beans around the base of the straw. Allow the white chocolate 'glue' to dry for a few minutes before building up the layers of sweet on the straw. Whilst those on the straw are drying, start to apply a few to the top of the cake. You may want to have some overflowing the side of the cake too.
- Place tissue paper into the jelly bean container. Position the container in the illusion so that the straws sit inside the sweet container.
- Enjoy!
Notes
Avoid using too much jam and frosting between the cake layers as this could result in them slipping.
Don't be concerned if the first layer of frosting shows a few cake crumbs, these will be hidden once the second layer of frosting is applied.
Consider the angle which will create a 'natural' looking illusion. Place the straws into the cake at this angle. Wooden or plastic cake dowles can also be used in place of the straws.
Stand back from the cake periodically to try to judge how 'realistic' the illusion of pouring sweets look, considering where more sweet need to be positioned.
Take your time in building up the layers of sweets, allowing them to dry before adding more (this only takes a couple of minutes). Pop into a fridge for a few minutes to speed the setting of the chocolate.
The tissue inside the jelly bean container will help you to position it on a more effective angle.
If you can not get jelly beans in a cup you can use a bag instead.