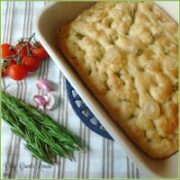
NO-KNEAD ROSEMARY & GARLIC FOCACCIA.
This no-knead focaccia, flavoured with rosemary and garlic, is easy to make and great for tearing and sharing with family and friends.
Servings: 1 loaf
Ingredients
FOR THE GARLIC INFUSED OLIVE OIL
- 50 ml Olive Oil
- 3 cloves of Garlic
FOR THE ROSEMARY & GARLIC FOCACCIA
- 250 g Strong White Bread Flour
- 5 g Salt
- ½ teaspoon Easy Bake Yeast
- 50 ml Garlic infused Olive Oil as above
- 180 ml cool Water
- 1 sprig of fresh Rosemary
Instructions
- Combine the garlic and olive oil. Measure 50ml of olive oil into a jug and add the garlic cloves. Stir and cover with clingfilm. Set aside for as long as you’re able to allow the garlic flavour to infuse into the olive oil. I left ours for 24 hours. Periodically rock the jug containing the flavoured oil to and fro to allow the flavours to merge. Alternatively use a ready infused oil from the supermarket.
- Make the focaccia dough. Place the flour, salt and yeast in a good size bowl keeping the salt away from the yeast at this stage. Combine with your hand or wooden spoon.
- Make a well in the flour. Add 1.5 tablespoons of the garlic infused oil and pour in most of the water. With your hand or wooden spoon mix the flour into the liquid aiming to combine all of the flour into a soft dough. Add the remaining water to pick up any surplus flour. The dough will be quite soft and sticky at this stage.
- Prove. Cover with clingfilm or a shower cap (used purely for baking). Place the covered bowl somewhere cool (though not in a draft), to allow the dough to prove slowly. It will triple in size. Ours was ready for the next stage after 16 hours. See notes.
- Prepare your baking tray. Lay a strip of greaseproof paper in the base of the baking dish and grease the sides with a little butter or olive oil.
- Shape the dough. Without knocking back the dough, use a spatula to carefully scrape around the side of the bowl and tip the aerated dough into the prepared baking vessel. Use your fingers or the tip of the spatula to encourage the dough to take the shape of the baking dish, though you don’t need to be too precise about it. Dip your finger in the garlic infused olive oil and prod the dough a few times to create indentations. If you prefer to keep your hands clean use the handle of a spoon rather than your finger.
- Prove again. Cover the baking vessel with either a shower cap or clingfilm. Set aside for a further hour.
- Pre-heat the oven. Preheat the oven to maximum.
- Add rosemary and more olive oil to the dough. Just before baking, dip your finger (or spoon handle) into the garlic infused oil and make some more dimples in the dough. Remove the leaves from the rosemary sprig and place the leaves and mini sprigs into the indentations (ensuring that there are no tough woody stems attached). Drizzle any remaining olive oil over the dough.
- Bake. Place the bread in the centre of the oven and immediately reduce the oven temperature to 220 / 200 Fan / Gas mark 8. Bake for 20 – 25 minutes.
- Enjoy!
Notes
Specific Equipment:
Cling Film / Shower Cap (used purely for baking)
Baking Dish (I used a stoneware Le Creuset dish measuring 18cm x 25.5cm) Greaseproof Paper Spatula
Cook's Tips
a) More flavour is created in the bread by proving it slowly.
b) If the dough has successfully proved (step 3) before you’re ready for the next stage place the bowl in the fridge to slow the process down, though do consider that the dough will need to return to room temperature before it can be proved for the second time.